


|
|
||
|
YAMI4 is a messaging solution for distributed systems.
ThreadX is a Real-Time Operating System (RTOS) designed specifically for deeply embedded, real-time, and IoT applications.
NetX is an advanced IP network stack, designed as part of the ThreadX solution family.
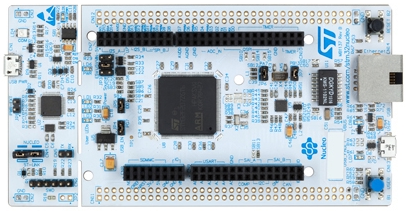
STM32F429Zi Nucleo board is a board from ST that allows to prototype IoT products and looks like here:
Last but not least, the IAR Embedded Workbench is a development environment, recognized in the embedded world and representative with regard to the general workflow. Other IDEs with comparable features will require similar setup.
This article describes their integration, the steps taken to build and run the example program and the concerns that need to be taken into account when developing similar applications.
Note that there is a sibling article about the use of YAMI4 with the FreeRTOS and the LwIP network stack.
Article outline:
Running the subscription example
Both ThreadX and NetX are provided with the IAR project files, which makes it easier to integrate them within a single workspace (a workspace is a collection of projects). In order to fit this scheme, similar project definitions exist for the YAMI4 libraries - the core library, which provides basic messaging services, and the general-purpose C++ library, which supports higher-level messaging patterns on top of the core library.
Of course, the actual application also needs to be included in the workspace, so the complete workspace setup might look like this:
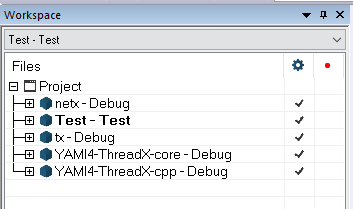
Above, netx, tx, YAMI4-ThreadX-core and YAMI4-ThreadX-cpp are library projects and Test is the actual application program that directly relies on the general-purpose C++ library, but indirectly requires all the others.
The NetX library comes with the driver that is dedicated to the target device. This driver, composed of two source files that are added to the application project, is dedicated for a single device or a family of related devices and might not be appropriate for other boards.
Both YAMI4 library project files are included in the YAMI4 package, in src/core and src/cpp directories and the workspace setup described here assumes that ThreadX, NetX, YAMI4 and the actual test application are in sibling directories (that is, at the same level).
STM32CubeMX is a graphical wizard and project configurator that allows to generate a skeleton for the application, taking into account the selection and configuration of general system properties (like clocks) and peripherals. Considering the level of complexity of modern microcontrollers, it is a proper tool to generate the basic structure of the final project.
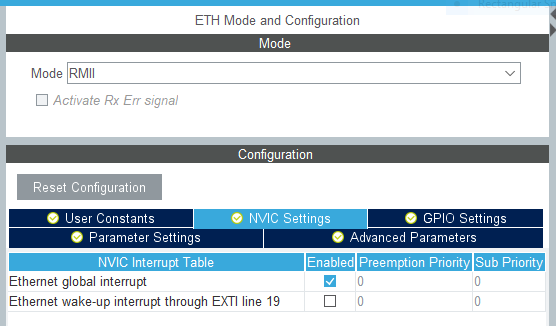
There are two concerns that need to be taken into account with regard to the default project configuration for the STM32F429 device. First, the ETH peripheral needs to have interrupts enabled:
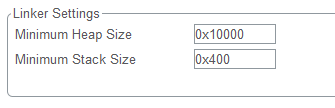
Second, the default heap space of 0x200 is certainly too small for handling the needs of all involved components and something reasonably bigger needs to be set up (the actual size will depend on the messaging needs of the application):
Interestingly, just setting the heap size value is sufficient for the code generated by STM32CubeMX, but the other components also need a hint for the "free space" border in the memory space. This hint can be provided by adding the following line at the end of the generated Test/EWARM/stm32f429xx_flash.icf file:
place in RAM_region { last section FREE_MEM };
Once the project skeleton is generated by STM32CubeMX and put together with the ThreadX, NetX and YAMI4 libraries in a single workspace, the more detailed look at the application project structure is:
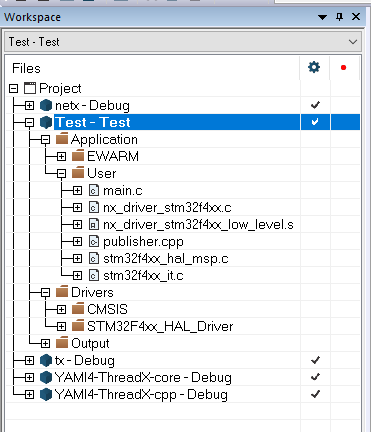
There are multiple files copied or generated by STM32CubeMX, but the ones that are of direct interest to the developer are in the User group:
main() function; this function will be modified to invoke the actual application code, conveniently put in a separate file to minimize the conflicts when the code is re-generated,Having the workspace and file structure in place, the following options need to be considered to properly tie together all involved projects. These settings can be used as a source of inspiration for preparing similar project structures in other development environments.
For the YAMI4 Core library:

The device setting above just reflects the choice of target device. YAMI4 does not have any particular requirements with regard to the FPU settings (it does not perform any FPU operations, only passes values for serialization purposes), but the option chosen needs to be consistent across the whole workspace.
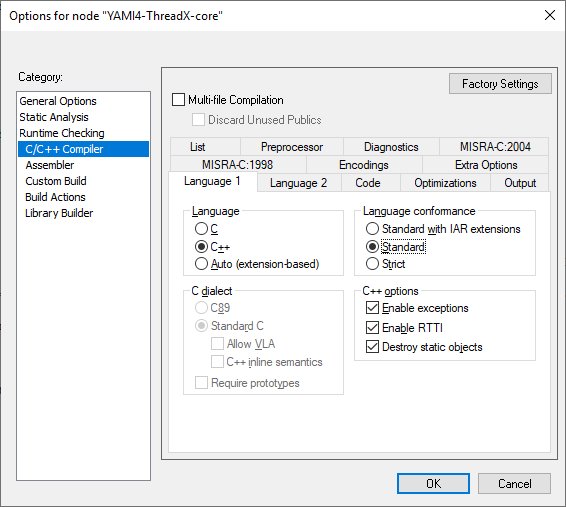
The setting above makes sure that the C++ language can be used to its reasonable extent. The YAMI4 Core library does not use exceptions or RTTI, but calls back into higher levels that do.

Finally, the YAMI4 Core library relies on services provided by ThreadX and NetX and also has its own system-abstraction layer that needs to be referenced. The include directories reflect these dependencies. Note also the YAMI4_WITH_NETX symbol, it needs to be defined to enable code paths specific to the NetX integration.
With all the options set appropriately, the YAMI4 Core library project should involve all these source files from the YAMI4 distribution package:
For the general-purpose YAMI4 C++ library:
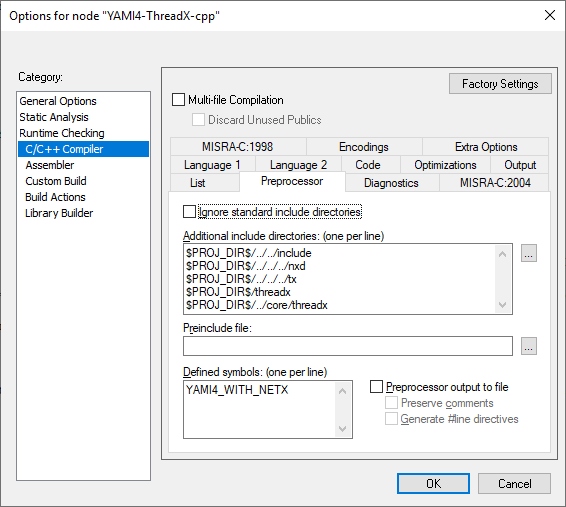
Above, the include paths refer to the other library projects. Apart from the nxd and tx directories higher in the tree, the dependencies point to the content of the YAMI4 distribution package. Note again the YAMI4_WITH_NETX symbol.
Similarly to the core part, the YAMI4 C++ library project should refer to the following sources from the YAMI4 distribution package:
Finally, for the actual application:
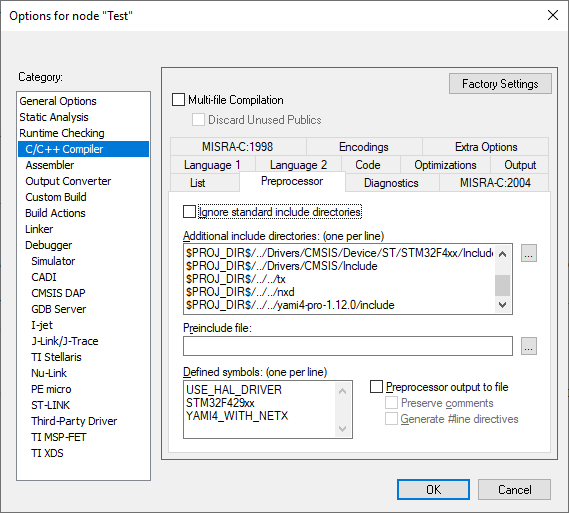
The application project was generated by STM32CubeMX and most of the include directories are for the involved CMSIS drivers. Still, it is necessary to provide dependencies to ThreadX, NetX and YAMI4. Note again the YAMI4_WITH_NETX symbol added to the list, it is still needed, even at the application level.
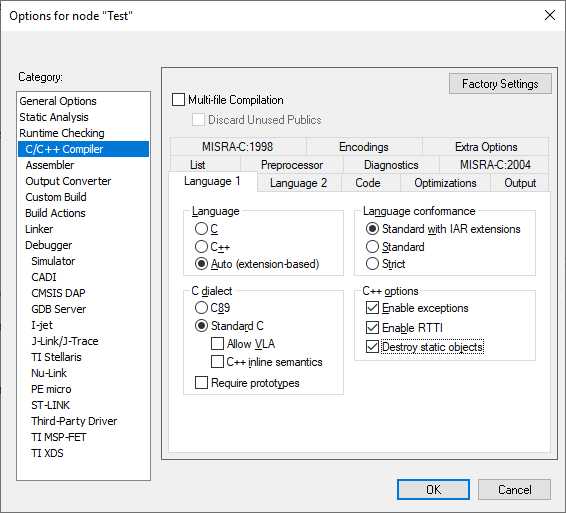
Above, the application contains both C and C++ files and all C++ facilities need to be available.
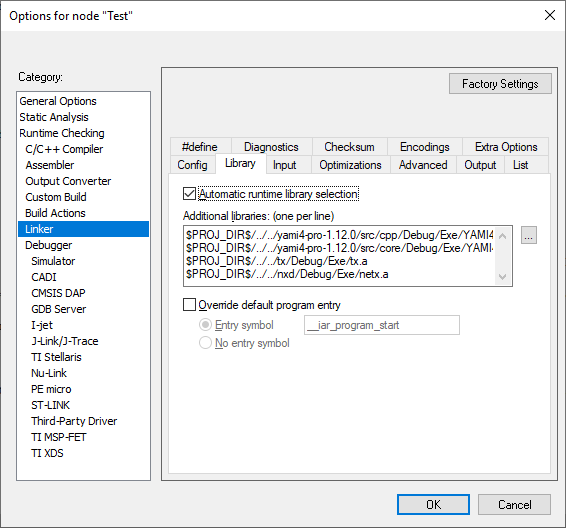
... and of course the application needs to link with all involved libraries (ThreadX, NetX, YAMI4 Core and YAMI4 C++), picked from where they are built.
Unfortunately, the STM32CubeMX tool and ThreadX/NetX do not know about each other and a bit of manual work needs to be done to properly integrate all involved components.
Interrupts
Both CubeMX-generated code and ThreadX rely on SysTick, but two handlers cause linker conflicts. A possible way to resolve them is to modify the tx_initialize_low_level.s source file, where the SysTick_Handler function is defined and comment out (or remove) the lines that define that symbol:
;    PUBLIC  SysTick_Handler
    PUBLIC  __tx_SysTickHandler
;SysTick_Handler:
__tx_SysTickHandler:
; VOID SysTick_Handler (VOID)
; {
;
    PUSH    {lr}
#ifdef TX_ENABLE_EXECUTION_CHANGE_NOTIFY
    BL      _tx_execution_isr_enter             ; Call the ISR enter function
#endif
    BL      _tx_timer_interrupt
#ifdef TX_ENABLE_EXECUTION_CHANGE_NOTIFY
    BL      _tx_execution_isr_exit              ; Call the ISR exit function
#endif
    POP     {lr}
    BX      LR
; }
Fortunately, the __tx_SysTickHandler is also defined for the same function, so it is still possible to call it from the other handler - the one generated by STM32CubeMX, in the stm32f4xx_it.c file:
void __tx_SysTickHandler();
void SysTick_Handler(void)
{
  HAL_IncTick();
  __tx_SysTickHandler();
}
Above, the __tx_SysTickHandler() function (the one defined in ThreadX) is declared and then called from the single SysTick_Handler handler, in addition to the CubeMX-generated processing.
Another linker conflict relates to the PendSV_Handler, which can be commented out entirely in the stm32f4xx_it.c file, because that version is by default empty.
Finally, the ETH_IRQHandler should be commented out, too - the one defined by NetX will take over and properly process the interrupts delivered by the ETH peripheral.
The main function
The main function initializes the hardware components as defined by the STM32CubeMX project configurator and includes an example infinite loop where the user code can be written. In the case of network-oriented application that infinite loop is elsewhere and is more involved, so the only thing that needs to be done in the main.c file is a call to the actual example code in the publisher.cpp file:
void run_publisher();
int main(void)
{
  // STM32CubeMX-generated initialization calls:
  HAL_Init();
  SystemClock_Config();
  MX_GPIO_Init();
  MX_ETH_Init();
  MX_USART3_UART_Init();
  MX_USB_OTG_FS_PCD_Init();

  // transfer control to the actual application:
  run_publisher();
}
Above, the run_publisher function is declared and then called instead of the infinite loop at the end of main.
The subscription example is the most elaborate in the YAMI4 distribution package, because the publisher program acts both as a server (accepts subscription requests from clients) and as a client (sends a stream of data updates to subscribers).
The following screenshot (click for full size) demonstrates the publisher program running on the STM32F429 board, with two subscribers launched on the host computer - they are started several seconds after the program starts on the board. As can be seen, values generated by the board are properly delivered to both subscriber programs.
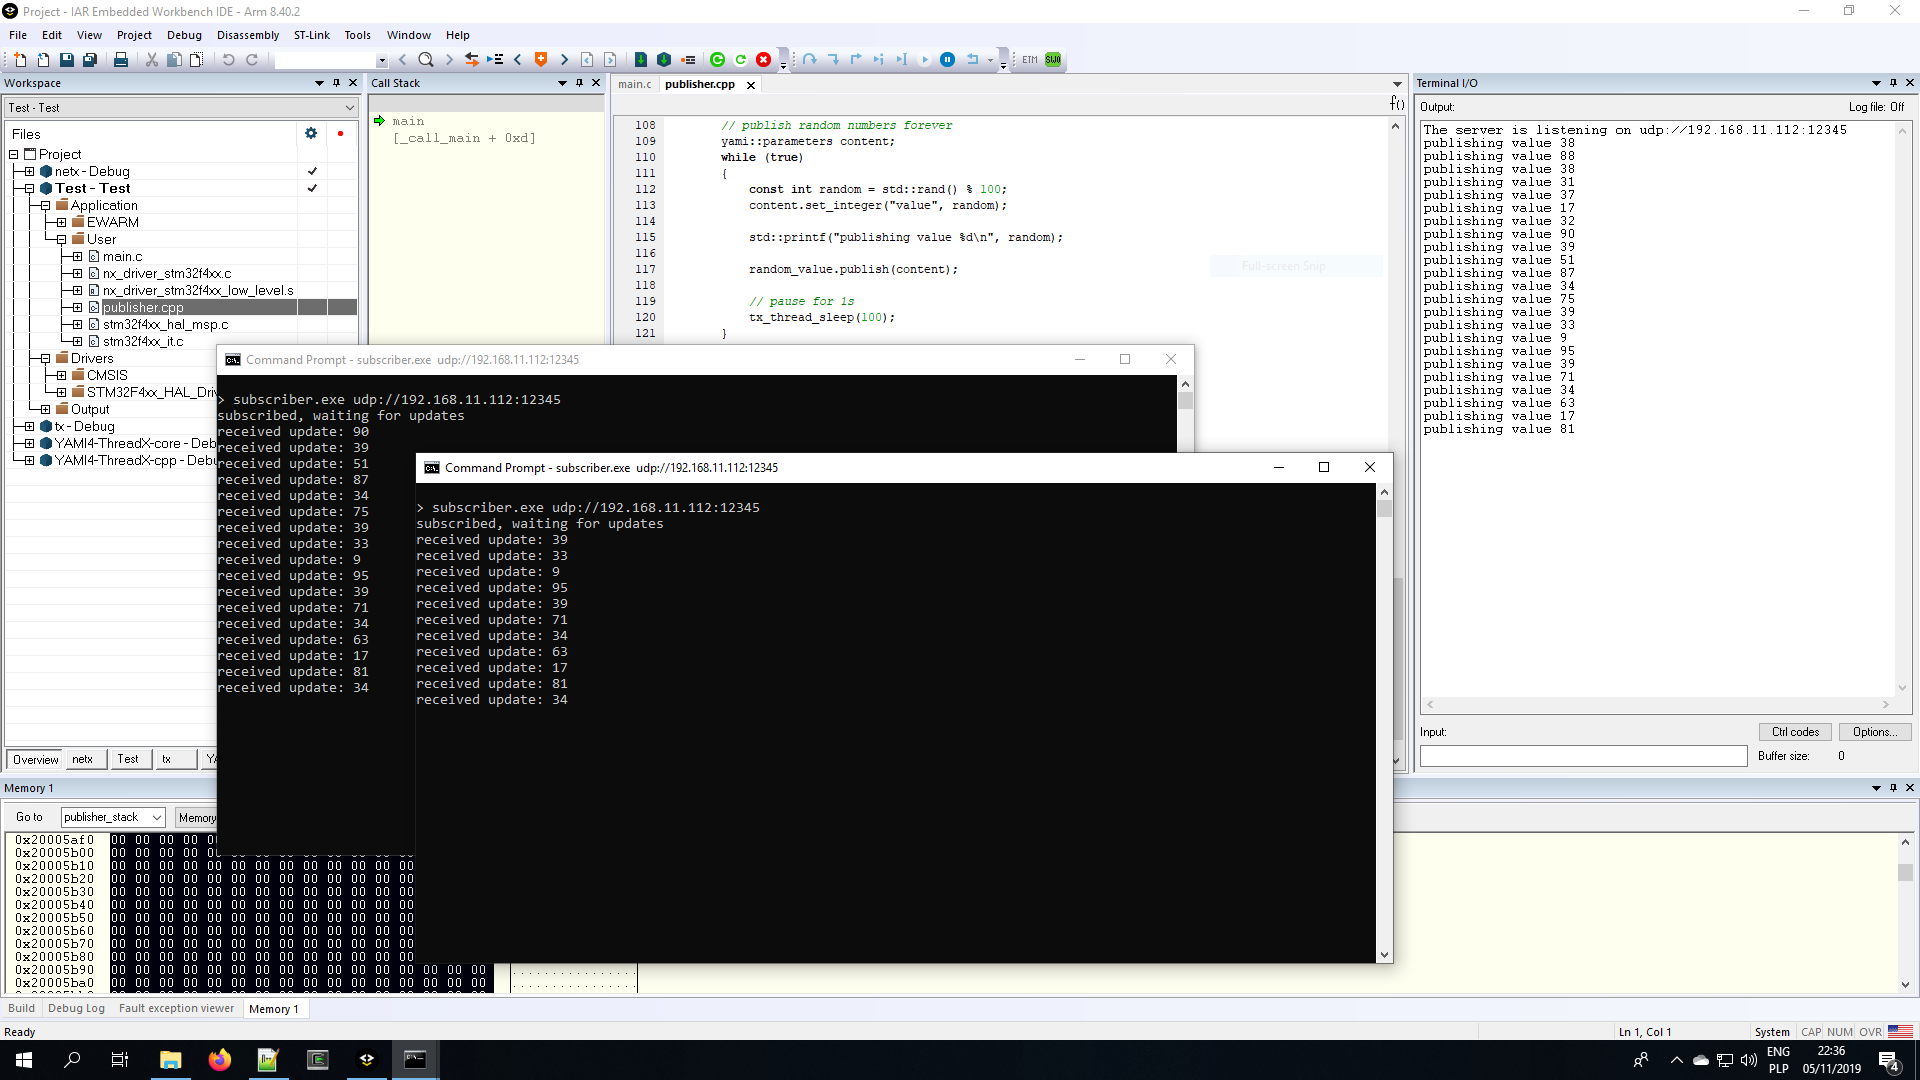
Note that in the background, in the central pane of the development environment, a fragment of publisher.cpp file is visible with the loop that actually is responsible for periodic generation of new published values. This code is very high-level, with a single line actually devoted to publishing the value to all currently active subscribers - yet it is all that is needed and the YAMI4, ThreadX and NetX libraries do the rest.
One of the main design goals of YAMI4 is to be composable and non-intrusive with regard to its application in the target program. These goals mean in particular that YAMI4 should not hijack the environment and it should not assume that it is the only user of some resource, like a memory space or a network stack. These goals are straightforward on a POSIX or Windows system, where system resources are managed outside of the user code, but in RTOS it is the user code that decides when and how the environment is set up. In order not to interfere with the policies of the user code:
This approach allows the user retain complete control over when and how these critical system resources are created, which includes decisions like whether resources are allocated statically or dynamically or what should be the task priorities or their stack sizes. See the example programs (like the complete content of the publisher.cpp presented above) to check how the user code can provide the necessary resources to the YAMI4 agent.
Go to the YAMI4 homepage to learn more about the project and to find its distribution packages.